寫在前面
在 SaaS 領域 Salesforce 是佼佼者,其 CRM 的概念已經擴充套件到了 Marketing、Sales、Service 等領域。那麼 Salesforce 靠什麼變成了這三個行業的解決方案呢?得益於 Salesforce 強大的 aPaaS 平臺。
ISV、內部實施、客戶均可以從自己的維度基於 aPaaS 平臺構建自己的行業,實現業務定製,甚至是行業定製。因為在此之前只有在 Sales 方向有專門的 SaaS 產品,而 Marketing 和 Service 都是由自己的 ISV 在各自行業的解決方案。所以 Salesforce 已經從一家 SaaS 公司變成了一家 aPaaS 平臺公司了。
搭建一個 aPaaS 平臺是需要很長時間的,當然也可以基於一些公有云產品的 Serverless 方案實現現有系統的靈活性與擴充套件性,從而實現針對於不同客戶的定製。
什麼是 ServerlessServerless 由兩部分組成,Server 和 Less。
前者可以理解為其解決方案範圍處在服務端;後者可以譯為少量的;組合起來就是較少服務端干預的服務端解決方案。
與 Serverless 相對的是 Serverfull,比較下對應的概念可能更便於理解。
在 Serverfull 時代,研發交付流程一般有三個角色:RD,PM,QA。
RD 根據 PM 的 PRD 進行功能開發,交付到 QA 進行測試,測試完成之後釋出到伺服器。由運維人員規劃伺服器規格、數量、機房部署、節點擴縮容等,這種更多由人力處理的時代就是 Serverfull 時代。
之後進入了 DevOps 時代。這個時代運維自己開發一套運維控制檯,可以讓研發同學在控制檯上自己進行服務觀測、資料查詢、運維處理等,運維同學的工作輕鬆了不少,這個階段主要釋放了運維同學的人力。
而到了 Serverless 時代,這套運維控制檯能力越來越豐富,可以實現按配置的自動擴縮容、效能監控、DevOps 流水線等,同時侵入到研發流程側,比如自動釋出流水線、編譯打包、程式碼質量監測、灰度釋出、彈性擴縮等流程基本不需要人力處理了,這就是 Serverless 時代。
Serverless 怎麼用相信你有過這樣的經歷,在一個 Web 介面上,左側寫程式碼,右側展示執行效果。
寫的是程式碼塊,程式碼數量不會特別大;程式碼執行速度快;支援多種程式語言;可以支援不可預計的流量洪峰衝擊。以阿里雲解決方案看下如何支援多語言架構:
抽象來說,前端只需要將程式碼片段和程式語言的標識傳給 Server 端即可,等待響應結果。Server 端可以針對於不同程式語言進行 runtime 分類、預處理等工作。
Serverless 怎麼做很多人把 Serverless 看做是 FC(function compute:函式計算),使用函式計算,無需業務自己搭建 IT 基礎設施,只需要編碼並上傳程式碼。函式計算會按需為你準備好計算資源,彈性、可靠地執行,並提供 trace、日誌查詢、監控告警等治理能力。
比如:
在 FC 中有服務和函式之分。一個服務可以包含多個函式。我們可以用微服務理解,我們透過 golang 或 java 搭建了一個微服務架構,而 FC 服務就是其中的類,FC 函式是類中的一個方法:
區別在於 Java 搭建的微服務只能執行 java 類程式碼,golang 的類只能執行 go 寫的程式碼,而 FC 函式可以安裝不同語言的 runtime,支援執行不同語言程式。
類比理解之後,我們再看下如何呼叫 FC 的函式,一般的 FC 解決方案裡面都有一個觸發器的概念。比如 HTTP 觸發器、物件儲存觸發器、日誌服務觸發器、定時任務觸發器、CDN 觸發器、訊息佇列觸發器等。觸發器是對於 FC 函式呼叫的抽象收口,比如 HTTP 觸發器一般都類比閘道器的一個 http 請求事件,或是指定物件儲存路徑下上傳了一個圖片,這些觸發事件的入口都可以是觸發器。
觸發器產生事件之後可以呼叫 FC 函式,函式執行的邏輯可以是下載一張圖片或是註冊一個使用者。
這樣從觸發器到 FC 函式邏輯處理就是一個 FC 的生命週期了。
那麼 FC 是如何實現高可用的呢?
其實每個函式底層程式碼都是執行在一套 IaaS 平臺上,使用 IaaS 資源,我們可以為每個函式設定執行程式碼時需要的記憶體配置即可,比如最小 128M,最大 3G 等。研發人員不需要關心程式碼執行在什麼樣的伺服器上,不需要關心啟動了多少函式例項支援當前場景,不需要關注背後的彈性擴縮問題,這些都被收斂在 FC 之後。
如圖有兩種高可用策略:
給函式設定併發例項數,比如 3 個,那麼當有三個請求進來時,該函式只啟動一個例項,但是會啟動三個執行緒來執行邏輯;執行緒達到上限後,會再拉起一個函式例項。類似於執行緒池的方案。
那麼 Serverless 如何提效呢?
效率高:如果新加了語言,只需要建立一個對應的 Runtime 的 FC 函式即可;高可用:透過多執行緒、多例項兩種方式保障高可用,且函式例項擴縮容完全由 FC 自助處理,不需要運維做任何配置;成本低:在沒有觸發器請求時,函式例項不會被拉起,也不會計費,所以在流量低谷期間或者夜間時,FC 消耗的成本是非常低的。如何在雲平臺建立一個 FC1. 建立服務
首先新建一個服務名稱;選定服務部署的地區(背後幫助你就近部署在目標機房);選擇是否開啟除錯日誌(開發過程開啟,線上執行時可關閉)。2. 建立函式
有了服務之後就可以建立函數了,比如選擇基於 http 請求的函式。
選擇函式繫結的服務;設定函式名稱;選擇 runtime 環境;是否要求函式例項彈性;函式入口(觸發器直接呼叫的目標方法);函式執行記憶體;函式執行超時時間;設定例項併發度。配置觸發器,比如選擇了 HTTP 觸發器,然後在觸發器上繫結函式名稱,由於是 http 訪問,可以選擇訪問的鑑權、認證方式,以及請求方式 POST or GET。
3. 程式碼編寫
當函式建立好了之後,進入函式,可以看到描述、程式碼執行歷史、觸發器型別、日誌查詢頁等。如果是 HTTP 觸發器,需要配置 http 觸發路徑。
可以看到就如前面介紹的那種,類似於類裡面的一個函式,上下文請求會打到這裡,直接執行。
Python 程式碼為例:
# -*- coding: utf-8 -*-import loggingimport urllib.parseimport timeimport subprocessdef handler(environ, start_response): context = environ['fc.context'] request_uri = environ['fc.request_uri'] for k, v in environ.items(): if k.startswith('HTTP_'): pass try: request_body_size = int(environ.get('CONTENT_LENGTH', 0)) except (ValueError): request_body_size = 0 # 獲取使用者傳入的code request_body = environ['wsgi.input'].read(request_body_size) codeStr = urllib.parse.unquote(request_body.decode("GBK")) # 因為body裡的物件裡有code和input兩個屬性,這裡分別獲取使用者code和使用者輸入 codeArr = codeStr.split('&') code = codeArr[0][5:] inputStr = codeArr[1][6:] # 將使用者code儲存為py檔案,放/tmp目錄下,以時間戳為檔名 fileName = '/tmp/' + str(int(time.time())) + '.py' f = open(fileName, "w") # 這裡預置引入了time庫 f.write('import time \r\n') f = open(fileName, "a") f.write(code) f.close() # 建立子程序,執行剛才儲存的使用者code py檔案 p = subprocess.Popen("python " + fileName, stdout=subprocess.PIPE, stdin=subprocess.PIPE, stderr=subprocess.PIPE, shell=True, encoding='utf-8') # 透過標準輸入傳入使用者的input輸入 if inputStr != '' : p.stdin.write(inputStr + "\n") p.stdin.flush() # 透過標準輸出獲取程式碼執行結果 r = p.stdout.read() status = '200 OK' response_headers = [('Content-type', 'text/plain')] start_response(status, response_headers) return [r.encode('UTF-8')]流程如下:
前端傳入程式碼片段,格式是字串;在 FC 函式中獲取到傳入的程式碼字串,擷取 code 內容和 input 內容;將程式碼儲存為一個 py 檔案,以時間戳為檔案命名,儲存在 FC 函式的 /tmp 目錄下,每個函式有自己獨立的 /tmp 目錄;import time 庫程式碼;透過 subprocess 建立子流程,以 shell 方式透過 py 命令執行儲存在 /tmp 目錄下的 py 檔案;最後讀取執行結果返回給前端。前端呼叫 FC 函式:
整個過程只需要前端將程式碼傳入到 FC 函數里面,整個 Server 端各個環節都不需要研發與運維同學關心,體現了 Serverless 的精髓。
用 Serverless 協調工作流工作流可以用順序、分支、並行等方式來編排任務執行,之後流程會按照設定好的步驟可靠地協調任務執行,跟蹤每個任務的狀態切換,並在必要時執行定義的重試邏輯,確保流程順利執行。
工作流流程透過記錄日誌和審計方式來監視工作流的執行,便於流程的診斷與除錯。
系統靈活性與擴充套件性的核心是服務可編排,所以我們需要做的是將現有系統內部使用者希望定製的功能進行梳理、拆分、抽離、結合 FC 提供的無狀態能力,將這些功能點進行編排,實現業務流程的定製。
需靈活配置工作流的業務舉個例子,比如餐飲場景下不同商家可以配置不同的支付方式,可以走微信支付、銀聯支付、支付寶支付。可以同時支援三家,也可以某一家,可以到付,也可以積分兌換等。如果沒有一個好的配置化流程解決方案的話,系統中會出現大量硬編碼規則判斷條件,系統迭代疲於奔命,是個不可持續的過程。
有了 FC 搭建的工作流就可以很優雅地解決這種問題,比如規整流程如下:
上面的流程是使用者側的流程,接下來需要轉換成程式側的流程,透過約束的 FDL 建立工作流,如圖:
FDL 程式碼如下:
version: v1beta1type: flowtimeoutSeconds: 3600steps: - type: task name: generateInfo timeoutSeconds: 300 resourceArn: acs:mns:::/topics/generateInfo-fnf-demo-jiyuan/messages pattern: waitForCallback inputMappings: - target: taskToken source: $context.task.token - target: products source: $input.products - target: supplier source: $input.supplier - target: address source: $input.address - target: orderNum source: $input.orderNum - target: type source: $context.step.name outputMappings: - target: paymentcombination source: $local.paymentcombination - target: orderNum source: $local.orderNum serviceParams: MessageBody: $ Priority: 1 catch: - errors: - FnF.TaskTimeout goto: orderCanceled -type: task name: payment timeoutSeconds: 300 resourceArn: acs:mns:::/topics/payment-fnf-demo-jiyuan/messages pattern: waitForCallback inputMappings: - target: taskToken source: $context.task.token - target: orderNum source: $local.orderNum - target: paymentcombination source: $local.paymentcombination - target: type source: $context.step.name outputMappings: - target: paymentMethod source: $local.paymentMethod - target: orderNum source: $local.orderNum - target: price source: $local.price - target: taskToken source: $input.taskToken serviceParams: MessageBody: $ Priority: 1 catch: - errors: - FnF.TaskTimeout goto: orderCanceled - type: choice name: paymentCombination inputMappings: - target: orderNum source: $local.orderNum - target: paymentMethod source: $local.paymentMethod - target: price source: $local.price - target: taskToken source: $local.taskToken choices: - condition: $.paymentMethod == "zhifubao" steps: - type: task name: zhifubao resourceArn: acs:fc:cn-hangzhou:your_account_id:services/FNFDemo-jiyuan/functions/zhifubao-fnf-demo inputMappings: - target: price source: $input.price - target: orderNum source: $input.orderNum - target: paymentMethod source: $input.paymentMethod - target: taskToken source: $input.taskToken - condition: $.paymentMethod == "weixin" steps: - type: task name: weixin resourceArn: acs:fc:cn-hangzhou:your_account_id:services/FNFDemo-jiyuan.LATEST/functions/weixin-fnf-demo inputMappings: - target: price source: $input.price - target: orderNum source: $input.orderNum - target: paymentMethod source: $input.paymentMethod - target: taskToken source: $input.taskToken - condition: $.paymentMethod == "unionpay" steps: - type: task name: unionpay resourceArn: acs:fc:cn-hangzhou:your_account_id:services/FNFDemo-jiyuan.LATEST/functions/union-fnf-demo inputMappings: - target: price source: $input.price - target: orderNum source: $input.orderNum - target: paymentMethod source: $input.paymentMethod - target: taskToken source: $input.taskToken default: goto: orderCanceled - type: task name: orderCompleted resourceArn: acs:fc:cn-hangzhou:your_account_id:services/FNFDemo-jiyuan.LATEST/functions/orderCompleted end: true - type: task name: orderCanceled resourceArn: acs:fc:cn-hangzhou:your_account_id:services/FNFDemo-jiyuan.LATEST/functions/cancerOrder示例體現了基於 Serverless 的 FC 可實現靈活工作流。
流程如何觸發的呢?
在使用者選擇完商品、填完地址之後,透過拉取商品、訂單上下文,可以自動化觸發流程了。
在微服務背景下,很多能力不是閉環在單體程式碼邏輯之內,很多時候是多個業務系統的連線,比如串聯多個 OpenAPI 介面實現全流程:
如想使用流程引擎需要進行相關的備案鑑權:
@Configurationpublic class FNFConfig { @Bean public IAcsClient createDefaultAcsClient(){ DefaultProfile profile = DefaultProfile.getProfile( "cn-xxx", // 地域ID "ak", // RAM 賬號的AccessKey ID "sk"); // RAM 賬號Access Key Secret IAcsClient client = new DefaultAcsClient(profile); return client; }}startFNF 程式碼裡面流程如何串聯起來:
輸入要啟動的流程名稱,比如每次訂單編號作為啟動流程例項名稱;流程啟動後的流程例項名稱;啟動輸入引數,比如業務引數,比如一個 json 裡面有商品、商家、地址、訂單等上下文資訊。@GetMapping("/startFNF/{fnfname}/{execuname}/{input}") public StartExecutionResponse startFNF(@PathVariable("fnfname") String fnfName, @PathVariable("execuname") String execuName, @PathVariable("input") String inputStr) throws ClientException { JSONObject jsonObject = new JSONObject(); jsonObject.put("fnfname", fnfName); jsonObject.put("execuname", execuName); jsonObject.put("input", inputStr); return fnfService.startFNF(jsonObject); }再看下 fnfService.startFNF:
@Override public StartExecutionResponse startFNF(JSONObject jsonObject) throws ClientException { StartExecutionRequest request = new StartExecutionRequest(); String orderNum = jsonObject.getString("execuname"); request.setFlowName(jsonObject.getString("fnfname")); request.setExecutionName(orderNum); request.setInput(jsonObject.getString("input")); JSONObject inputObj = jsonObject.getJSONObject("input"); Order order = new Order(); order.setOrderNum(orderNum); order.setAddress(inputObj.getString("address")); order.setProducts(inputObj.getString("products")); order.setSupplier(inputObj.getString("supplier")); orderMap.put(orderNum, order); return iAcsClient.getAcsResponse(request); }前端如何呼叫?
fnfname:要啟動的流程名稱;execuname:隨機生成 uuid,作為訂單的編號,也作為啟動流程例項的名稱;input:將商品、商家、訂單號、地址構建為 JSON 字串傳入流程。submitOrder(){ const orderNum = uuid.v1() this.$axios.$get('/startFNF/OrderDemo-Jiyuan/'+orderNum+'/{\n' + ' "products": "'+this.products+'",\n' + ' "supplier": "'+this.supplier+'",\n' + ' "orderNum": "'+orderNum+'",\n' + ' "address": "'+this.address+'"\n' + '}' ).then((response) => { console.log(response) if(response.message == "success"){ this.$router.push('/orderdemo/' + orderNum) } }) }1. generateInfo 節點
先看下第一個 FDL 節點定義:
- type: task name: generateInfo timeoutSeconds: 300 resourceArn: acs:mns:::/topics/generateInfo-fnf-demo-jiyuan/messages pattern: waitForCallback inputMappings: - target: taskToken source: $context.task.token - target: products source: $input.products - target: supplier source: $input.supplier - target: address source: $input.address - target: orderNum source: $input.orderNum - target: type source: $context.step.name outputMappings: - target: paymentcombination source: $local.paymentcombination - target: orderNum source: $local.orderNum serviceParams: MessageBody: $ Priority: 1 catch: - errors: - FnF.TaskTimeout goto: orderCanceled```- name:節點名稱;- timeoutSeconds:超時時間,節點等待時長,超過時間後跳轉到 goto 分支指向的 orderCanceled 節點;- pattern:設定為 waitForCallback,表示需要等待確認;- inputMappings:該節點入參; - taskToken:Serverless 工作流自動生成的 Token; - products:選擇的商品; - supplier:選擇的商家; - address:送餐地址; - orderNum:訂單號;- outputMappings:該節點的出參; - paymentcombination:該商家支援的支付方式; - orderNum:訂單號;- catch:捕獲異常,跳轉到其他分支。Serverless 工作流支援多個雲服務整合,將其他服務作為任務步驟的執行單元。服務整合方式透過 FDL 表示式實現,在任務步驟中,可以使 用resourceArn 來定義整合的目標服務,使用 pattern 定義整合模式。在 resourceArn 中配置 /topics/generateInfo-fnf-demo-jiyuan/messages 資訊,就是集成了 MNS 訊息佇列服務,當 generateInfo 節點觸發後會向 generateInfo-fnf-demo-jiyuanTopic 中傳送一條訊息。訊息的正文和引數在 serviceParams 物件中 zhi'd 指定。MessageBody 是訊息正文,配置 $ 表示透過輸入對映 inputMappings 產生訊息正文。generateInfo-fnf-demo 函式:向 generateInfo-fnf-demo-jiyuanTopic 中傳送的這條訊息包含了商品資訊、商家資訊、地址、訂單號,表示一個下訂單流程的開始,既然有發訊息,那麼必然有接受訊息進行後續處理。在函式計算控制檯,建立服務,在服務下建立名為 generateInfo-fnf-demo 的事件觸發器函式,這裡選擇 Python Runtime: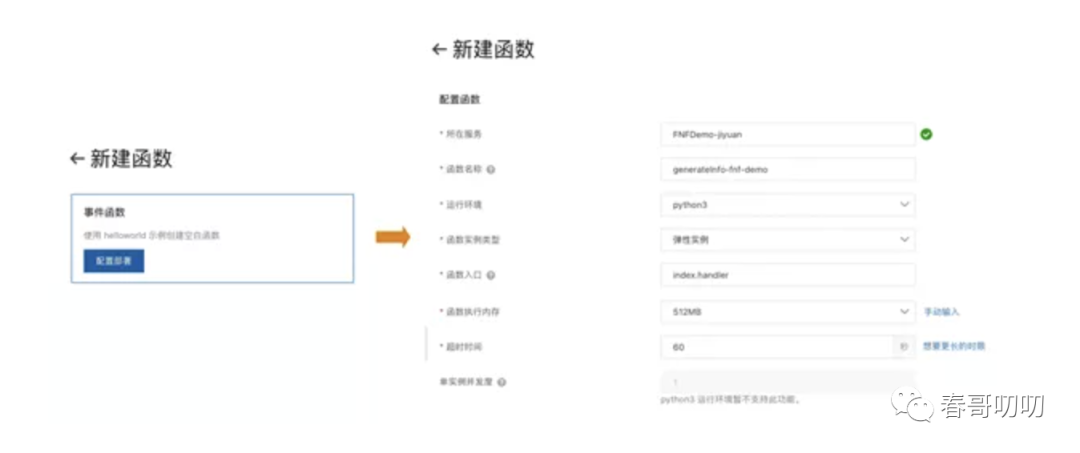建立 MNS 觸發器,選擇監聽 generateInfo-fnf-demo-jiyuanTopic: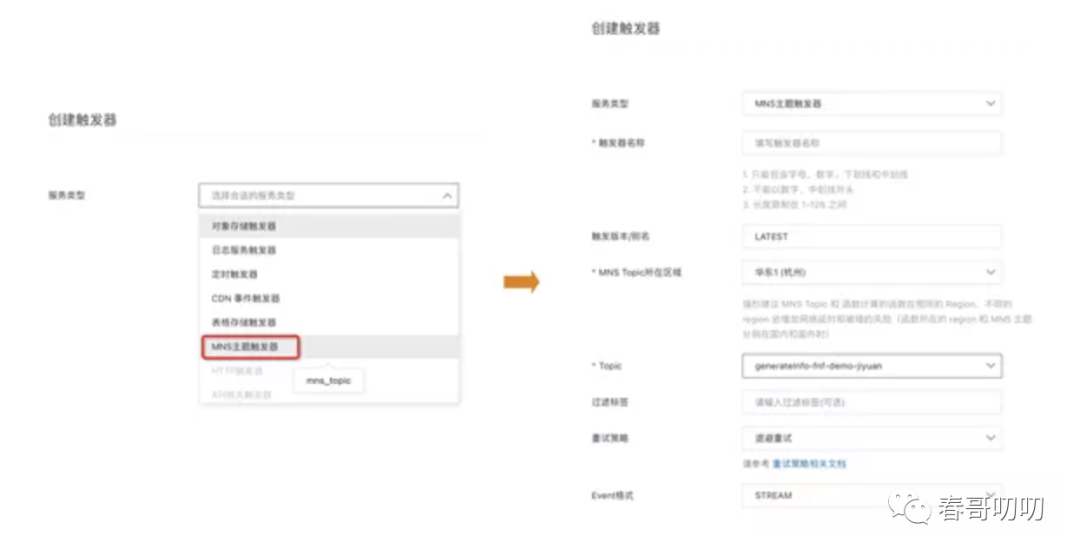開啟訊息服務 MNS 控制檯,建立 generateInfo-fnf-demo-jiyuanTopic: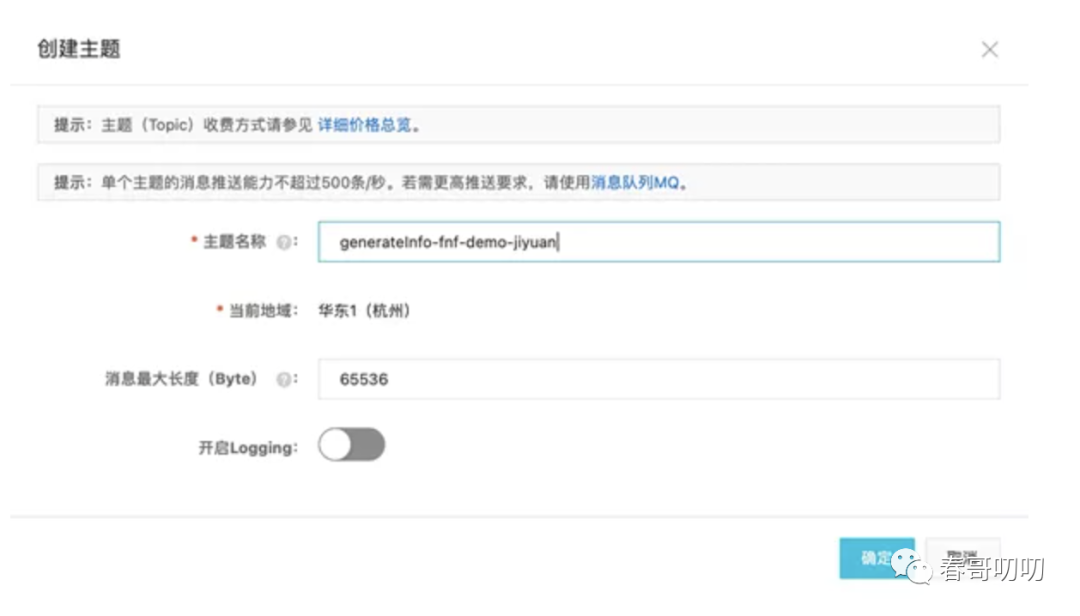接下來寫函式程式碼:import loggingimport jsonimport timeimport requestsfrom aliyunsdkcore.client import AcsClientfrom aliyunsdkcore.acs_exception.exceptions import ServerExceptionfrom aliyunsdkfnf.request.v20190315 import ReportTaskSucceededRequestfrom aliyunsdkfnf.request.v20190315 import ReportTaskFailedRequestdef handler(event, context):
1. 構建Serverless工作流Client
region = "cn-hangzhou"account_id = "XXXX"ak_id = "XXX"ak_secret = "XXX"fnf_client = AcsClient( ak_id, ak_secret, region)logger = logging.getLogger()# 2. event內的資訊即接受到Topic generateInfo-fnf-demo-jiyuan中的訊息內容,將其轉換為Json物件bodyJson = json.loads(event)logger.info("products:" + bodyJson["products"])logger.info("supplier:" + bodyJson["supplier"])logger.info("address:" + bodyJson["address"])logger.info("taskToken:" + bodyJson["taskToken"])supplier = bodyJson["supplier"]taskToken = bodyJson["taskToken"]orderNum = bodyJson["orderNum"]# 3. 判斷什麼商家使用什麼樣的支付方式組合,這裡的示例比較簡單粗暴,正常情況下,應該使用元資料配置的方式獲取paymentcombination = ""if supplier == "haidilao": paymentcombination = "zhifubao,weixin"else: paymentcombination = "zhifubao,weixin,unionpay"# 4. 呼叫Java服務暴露的介面,更新訂單資訊,主要是更新支付方式url = "http://xx.xx.xx.xx:8080/setPaymentCombination/" + orderNum + "/" + paymentcombination + "/0"x = requests.get(url)# 5. 給予generateInfo節點響應,並返回資料,這裡返回了訂單號和支付方式output = "{\"orderNum\": \"%s\", \"paymentcombination\":\"%s\" " \ "}" % (orderNum, paymentcombination)request = ReportTaskSucceededRequest.ReportTaskSucceededRequest()request.set_Output(output)request.set_TaskToken(taskToken)resp = fnf_client.do_action_with_exception(request)return 'hello world'程式碼分五部分:
構建 Serverless 工作流 Client;event 內的資訊即接受到 TopicgenerateInfo-fnf-demo-jiyuan 中的訊息內容,將其轉換為 Json 物件;判斷什麼商家使用什麼樣的支付方式組合,這裡的示例比較簡單粗暴,正常情況下,應該使用元資料配置的方式獲取。比如在系統內有商家資訊的配置功能,透過在介面上配置該商家支援哪些支付方式,形成元資料配置資訊,提供查詢介面,在這裡進行查詢;呼叫 Java 服務暴露的介面,更新訂單資訊,主要是更新支付方式;給予 generateInfo 節點響應,並返回資料,這裡返回了訂單號和支付方式。因為該節點的 pattern 是 waitForCallback,所以需要等待響應結果。generateInfo-fnf-demo 函式配置了 MNS 觸發器,當 TopicgenerateInfo-fnf-demo-jiyuan 有訊息後就會觸發執行 generateInfo-fnf-demo 函式。2. payment 節點接下來是 payment 的 FDL 程式碼定義:
type: taskname: paymenttimeoutSeconds: 300resourceArn: acs:mns:::/topics/payment-fnf-demo-jiyuan/messagespattern: waitForCallbackinputMappings:target: taskTokensource: $context.task.tokentarget: orderNumsource: $local.orderNum - target: paymentcombination source: $local.paymentcombinationtarget: typesource: $context.step.name outputMappings: - target: paymentMethod source: $local.paymentMethodtarget: orderNumsource: $local.orderNum - target: price source: $local.pricetarget: taskTokensource: $input.taskToken serviceParams: MessageBody: $Priority: 1catch:errors:FnF.TaskTimeoutgoto: orderCanceled當流程流轉到 payment 節點後,使用者就可以進入到支付頁面。
payment 節點會向 MNS 的 Topicpayment-fnf-demo-jiyuan 傳送訊息,會觸發 payment-fnf-demo 函式。
payment-fnf-demo 函式:
payment-fnf-demo 函式的建立方式和 generateInfo-fnf-demo 函式類似。
-*- coding: utf-8 -*-import loggingimport jsonimport osimport timeimport loggingfrom aliyunsdkcore.client import AcsClientfrom aliyunsdkcore.acs_exception.exceptions import ServerExceptionfrom aliyunsdkcore.client import AcsClientfrom aliyunsdkfnf.request.v20190315 import ReportTaskSucceededRequestfrom aliyunsdkfnf.request.v20190315 import ReportTaskFailedRequestfrom mns.account import Account # pip install aliyun-mnsfrom mns.queue import *def handler(event, context): logger = logging.getLogger() region = "xxx" account_id = "xxx" ak_id = "xxx" ak_secret = "xxx" mns_endpoint = "http://your_account_id.mns.cn-hangzhou.aliyuncs.com/" queue_name = "payment-queue-fnf-demo" my_account = Account(mns_endpoint, ak_id, ak_secret) my_queue = my_account.get_queue(queue_name) # my_queue.set_encoding(False) fnf_client = AcsClient( ak_id, ak_secret, region ) eventJson = json.loads(event) isLoop = True while isLoop: try: recv_msg = my_queue.receive_message(30) isLoop = False # body = json.loads(recv_msg.message_body) logger.info("recv_msg.message_body:======================" + recv_msg.message_body) msgJson = json.loads(recv_msg.message_body) my_queue.delete_message(recv_msg.receipt_handle) # orderCode = int(time.time()) task_token = eventJson["taskToken"] orderNum = eventJson["orderNum"] output = "{\"orderNum\": \"%s\", \"paymentMethod\": \"%s\", \"price\": \"%s\" " \ "}" % (orderNum, msgJson["paymentMethod"], msgJson["price"]) request = ReportTaskSucceededRequest.ReportTaskSucceededRequest() request.set_Output(output) request.set_TaskToken(task_token) resp = fnf_client.do_action_with_exception(request) except Exception as e: logger.info("new loop") return 'hello world'上面程式碼核心思路是等待使用者在支付頁面選擇某個支付方式確認支付。使用了 MNS 的佇列來模擬等待。迴圈等待接收佇列 payment-queue-fnf-demo 中的訊息,當收到訊息後將訂單號和使用者選擇的具體支付方式以及金額返回給 payment 節點。
前端選擇支付方式頁面:
經過 generateInfo 節點後,該訂單的支付方式資訊已經有了,所以對於使用者而言,當填完商品、商家、地址後,跳轉到的頁面就是該確認支付頁面,並且包含了該商家支援的支付方式。
進入該頁面後,會請求 Java 服務暴露的介面,獲取訂單資訊,根據支付方式在頁面上顯示不同的支付方式。
程式碼片段如下:
使用了一個 HTTP 觸發器型別的函式,用於實現向 MNS 發訊息的邏輯,paymentMethod-fnf-demo 函式程式碼:
-*- coding: utf-8 -*-import loggingimport urllib.parseimport jsonfrom mns.account import Account # pip install aliyun-mnsfrom mns.queue import *HELLO_WORLD = b'Hello world!\n'def handler(environ, start_response): logger = logging.getLogger() context = environ['fc.context'] request_uri = environ['fc.request_uri'] for k, v in environ.items(): if k.startswith('HTTP_'): # process custom request headers pass try: request_body_size = int(environ.get('CONTENT_LENGTH', 0)) except (ValueError): request_body_size = 0 request_body = environ['wsgi.input'].read(request_body_size) paymentMethod = urllib.parse.unquote(request_body.decode("GBK")) logger.info(paymentMethod) paymentMethodJson = json.loads(paymentMethod) region = "cn-xxx" account_id = "xxx" ak_id = "xxx" ak_secret = "xxx" mns_endpoint = "http://your_account_id.mns.cn-hangzhou.aliyuncs.com/" queue_name = "payment-queue-fnf-demo" my_account = Account(mns_endpoint, ak_id, ak_secret) my_queue = my_account.get_queue(queue_name) output = "{\"paymentMethod\": \"%s\", \"price\":\"%s\" " \ "}" % (paymentMethodJson["paymentMethod"], paymentMethodJson["price"]) msg = Message(output) my_queue.send_message(msg) status = '200 OK' response_headers = [('Content-type', 'text/plain')] start_response(status, response_headers) return [HELLO_WORLD]函式的邏輯很簡單,就是向 MNS 的佇列 payment-queue-fnf-demo 傳送使用者選擇的支付方式和金額。
3. paymentCombination 節點
paymentCombination 節點是一個路由節點,透過判斷某個引數路由到不同的節點,以 paymentMethod 作為判斷條件:
- type: choice name: paymentCombination inputMappings: - target: orderNum source: $local.orderNum - target: paymentMethod source: $local.paymentMethod - target: price source: $local.price - target: taskToken source: $local.taskToken choices: - condition: $.paymentMethod == "zhifubao" steps: - type: task name: zhifubao resourceArn: acs:fc:cn-hangzhou:your_account_id:services/FNFDemo-jiyuan/functions/zhifubao-fnf-demo inputMappings: - target: price source: $input.price - target: orderNum source: $input.orderNum - target: paymentMethod source: $input.paymentMethod - target: taskToken source: $input.taskToken - condition: $.paymentMethod == "weixin" steps: - type: task name: weixin resourceArn: acs:fc:cn-hangzhou:your_account_id:services/FNFDemo-jiyuan.LATEST/functions/weixin-fnf-demo inputMappings: - target: price source: $input.price - target: orderNum source: $input.orderNum - target: paymentMethod source: $input.paymentMethod - target: taskToken source: $input.taskToken - condition: $.paymentMethod == "unionpay" steps: - type: task name: unionpay resourceArn: acs:fc:cn-hangzhou:your_account_id:services/FNFDemo-jiyuan.LATEST/functions/union-fnf-demo inputMappings: - target: price source: $input.price - target: orderNum source: $input.orderNum - target: paymentMethod source: $input.paymentMethod - target: taskToken source: $input.taskToken default: goto: orderCanceled流程是,使用者選擇支付方式後,透過訊息傳送給 payment-fnf-demo 函式,然後將支付方式返回,於是流轉到 paymentCombination 節點透過判斷支付方式流轉到具體處理支付邏輯的節點和函式。
4. zhifubao 節點
看一個 zhifubao 節點:
choices: - condition: $.paymentMethod == "zhifubao" steps: - type: task name: zhifubao resourceArn: acs:fc:cn-hangzhou:your_account_id:services/FNFDemo-jiyuan/functions/zhifubao-fnf-demo inputMappings: - target: price source: $input.price - target: orderNum source: $input.orderNum - target: paymentMethod source: $input.paymentMethod - target: taskToken source: $input.taskToken節點的 resourceArn 和之前兩個節點的不同,這裡配置的是函式計算中函式的 ARN,也就是說當流程流轉到這個節點時會觸發 zhifubao-fnf-demo 函式,該函式是一個事件觸發函式,但不需要建立任何觸發器。流程將訂單金額、訂單號、支付方式傳給 zhifubao-fnf-demo 函式。
zhifubao-fnf-demo 函式:
# -*- coding: utf-8 -*-import loggingimport jsonimport requestsimport urllib.parsefrom aliyunsdkcore.client import AcsClientfrom aliyunsdkcore.acs_exception.exceptions import ServerExceptionfrom aliyunsdkfnf.request.v20190315 import ReportTaskSucceededRequestfrom aliyunsdkfnf.request.v20190315 import ReportTaskFailedRequestdef handler(event, context): region = "cn-xxx" account_id = "xxx" ak_id = "xxx" ak_secret = "xxx" fnf_client = AcsClient( ak_id, ak_secret, region ) logger = logging.getLogger() logger.info(event) bodyJson = json.loads(event) price = bodyJson["price"] taskToken = bodyJson["taskToken"] orderNum = bodyJson["orderNum"] paymentMethod = bodyJson["paymentMethod"] logger.info("price:" + price) newPrice = int(price) * 0.8 logger.info("newPrice:" + str(newPrice)) url = "http://xx.xx.xx.xx:8080/setPaymentCombination/" + orderNum + "/" + paymentMethod + "/" + str(newPrice) x = requests.get(url) return {"Status":"ok"}程式碼邏輯很簡單,接收到金額後,將金額打 8 折,然後將價格更新回訂單。其他支付方式的節點和函式如法炮製,變更實現邏輯就可以。在這個示例中,微信支付打了 5 折,銀聯支付打 7 折。
完整流程流程中的 orderCompleted 和 orderCanceled 節點沒做什麼邏輯,流程如下:
從 Serverless 工作流中看到的節點流轉是這樣的:
寫在後面以上是一個基於 Serverless 的 FC 實現的工作流,模擬構建了一個訂單模組,規則包括:
配置商家和支付方式的元資料規則;確認支付頁面的元資料規則。在實際專案中,需要將可定製的部分抽象為元資料描述,需要有配置介面供運營或商家定製支付方式也就是元資料規則,然後前後端頁面基於元資料資訊展示相應的內容。
如果之後需要接入新的支付方式,只需要在 paymentCombination 路由節點中確定好路由規則,之後增加對應的支付方式函式即可,透過增加元資料配置項,就可以在頁面展示新加的支付方式,並路由到新的支付函式中。
經過整篇文章相信很多人對於 Serverless 的定義,以及如何基於現有的公有云系統的 Serverless 功能實現商業能力已經有了一定的瞭解,甚至基於此有實力的公司可以自研一套 Serverless 平臺。當然思想是相同的,其實文中很多邏輯與理論不止適用於 Serverless,就是我們日常基於微服務的平臺化/中臺化解決方案,都可以從中獲取設計營養在工作中應用。
作者 | 春哥大魔王